
Vboxmanage ist ein nützliches Kommando um VirtualBox per CMD oder der PowerShell-Konsole zu steuern.
Attention: For the english version, click here!
Vorausgesetzt Oracle VirtualBox (Download hier) ist bereits installiert, so ist lediglich die Umgebungsvariable zu setzen, um den Befehl ausführen zu können. In den nachfolgenden Schritten zeige ich, wie das funktioniert. Dieser Weg funktioniert für Windows 10 und 11.
In meinem Fall ist VirtualBox unter folgendem Pfad installiert:
C:\Program Files\Oracle\VirtualBoxDort befindet sich ebenfalls die Anwendung VBoxManage.exe.
Jetzt müssen wir lediglich die Umgebungsvariable dafür setzen. Das ist über drei verschiedene Wege machbar.
Die Umgebungsvariable für VBoxManage setzen
Grafische Oberfläche
Dafür drücke ich die Windows-Taste und gebe in die Suche das Stichwort „Systemumgebungsvariable bearbeiten“ ein. Daraufhin sollte sich folgendes Fenster öffnen:
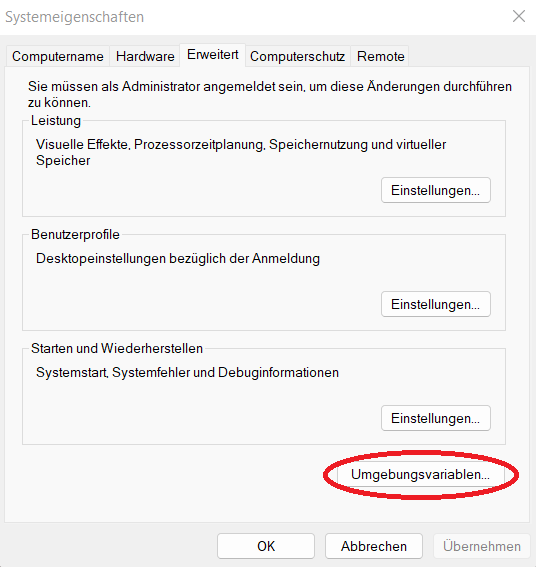
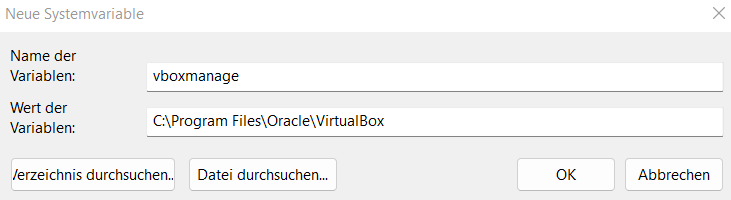
Dort öffnet sich über die Schaltfläche Umgebungsvariablen das neue Menüfenster, in der sich die neue Variable setzen lässt. In diesem Fenster klickt ihr wiederrum auf Schaltfläche „Neu“ und dort könnt ihr dann einen Namen vergeben und entsprechend den Pfad. Bei mir sieht das wie folgt aus:
Bestätigt zum Abschluss alle Fenster mit OK und die Umgebungsvariable ist gesetzt.
CMD (Eingabeaufforderung)
Öffnet die CMD und gebt folgenden Befehl ein:
SET PATH=%PATH%;C:\Program Files\Oracle\VirtualBoxPowerShell-Konsole
Öffnet die PowerShell-Konsole und macht folgende Eingabe:
$env:PATH = $env:PATH + ";C:\Program Files\Oracle\VirtualBox"
Vertrauen ist gut, Kontrolle ist besser
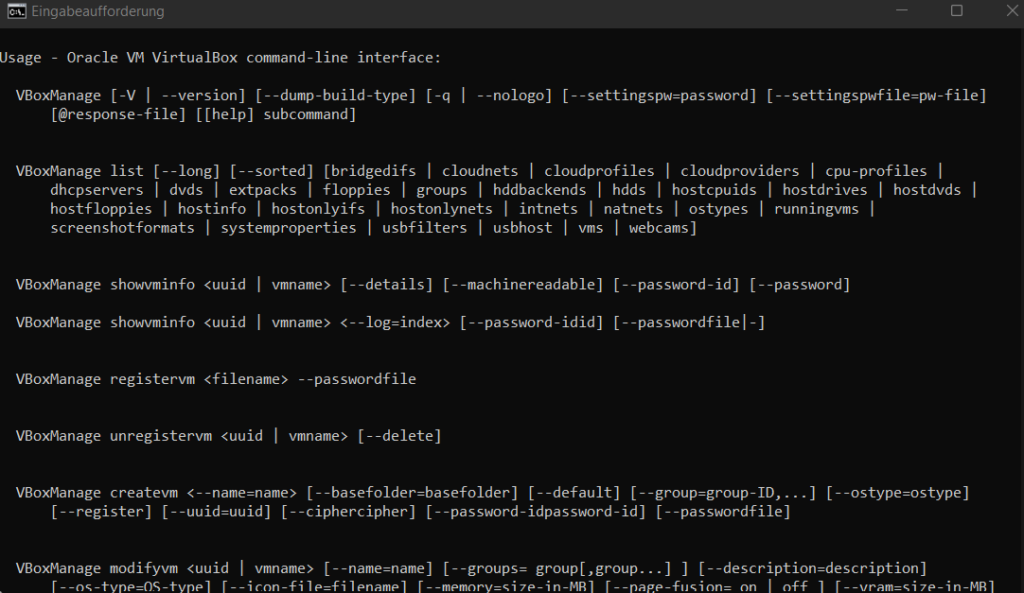
Habt ihr einen der drei Möglichkeiten umgesetzt, solltet ihr nun Zugriff auf das Kommando haben. Dazu öffnet entweder die CMD oder eine PowerShell-Konsole und gebt „vboxmanage“ ein
vboxmanageAls Output sollten euch etliche Nutzungsvorschläge des Befehls angezeigt werden:
Eine virtuelle Maschine mit VBoxManage erstellen
Natürlich hier auch noch der Ablauf, wie man eine virtuelle Maschine nun per CMD oder PowerShell-Konsole erstellen kann.
Der Name testvm sollte natürlich mit dem Namen eurer Wahl ersetzt werden.
VM namens testvm wird angelegt:
VBoxManage createvm --name testvm --registerBetriebssystem der VM festlegen, dazu ersteinmal die OS Identifier herausfinden:
VBoxManage list ostypesIn meinem Fall wird es eine FreeBSD 64bit:
VBoxManage modifyvm testvm --ostype FreeBSD_64
RAM festlegen:
VBoxManage modifyvm testvm --memory 2048 --vram 16CPU Kerne festlegen:
VBoxManage modifyvm testvm --cpus 2
Virtuelle Festplatte erstellen (Angabe erfolgt in Megabytes!):
VBoxManage createhd --filename testvm.vdi --size 16000
SATA Controller hinzufügen, Festplatte einhängen, sowie die ISO für die VM:
VBoxManage storagectl testvm --name "SATA Controller" --add sata --controller IntelAHCI

VBoxManage storageattach testvm --storagectl "SATA Controller" --port 0 --device 0 --type hdd --medium testvm.vdi

VBoxManage storageattach testvm --storagectl "SATA Controller" --port 1 --device 0 --type dvddrive --medium "C:\Users\byte-sized\Downloads\FreeBSD-13.1-RELEASE-amd64-dvd1"
Bootreihenfolge anpassen, sodass vom DVD-Laufwerk gestartet wird:
VBoxManage modifyvm testvm --boot1 dvd --boot2 disk --boot3 none --boot4 none
Netzwerkkarte auf Bridge setzen. Hierbei den Namen der Netzwerkkarte des Host-Systems eintragen:
VBoxManage modifyvm testvm --nic1 bridged --nictype1 82540EM --bridgeadapter1 "Realtek PCIe GbE Family Controller"
Et voilà! Die VM testvm ist über die CMD soweit konfiguriert. Wer mehr über die Möglichkeiten mit VBoxManage wissen möchte, der kann hier in der Dokumentation nachlesen.
Starten der VM
Es bietet sich die Möglichkeit die VM, wie gewohnt mit grafischer Anzeigefenster zu starten. Für eine erste Installation ist das natürlich absolut zweckmäßig, da höchstwahrscheinlich verschiedene Konfigurationsschritte vorgenommen werden müssen.
vboxmanage startvm testvmoder später um die VM „headless“ im Hintergrund zu starten:
VBoxManage startvm testvm --type headless
Herunterfahren und Löschen einer VM
Um eine VM wieder herunterzufahren, können wir folgendes Kommando nutzen:
vboxmanage controlvm testvm poweroff
Wenn eine VM nicht mehr benötigt wird, können wir sie einfach wieder löschen mit
VBoxManage unregistervm testvm --deleteAbschluss zu VBoxManage
Das soll es gewesen sein! Ich hoffe, der kleine Exkurs in die doch so große Welt von VBoxManage hat euch gefallen. Bis zum nächsten Mal!
VBoxManage: Control VirtualBox via CMD or PowerShell
Vboxmanage is a useful command to control VirtualBox via CMD or the PowerShell console. Assuming Oracle VirtualBox (download here) is already installed, you only need to set the environment variable to be able to execute the command. In the following steps I show how this works. This way works for Windows 10 and 11.
In my case VirtualBox is installed under the following path:
C:\Program Files\Oracle\VirtualBoxThe VBoxManage.exe application is also located there.
Now we just need to set the environment variable for it. This can be done in three different ways.
Set the environment variable for VBoxManage
Graphical user interface
To do this, I press the Windows key and enter the keyword „Edit system environment variable“ in the search. The following window should open:
There the button Environment variables opens the new menu window, in which the new variable can be set. In this window you click again on button „New“ and there you can assign a name and accordingly the path. For me it looks like this:
Finally, confirm all windows with OK and the environment variable is set.
CMD
Open the CMD and enter the following command:
SET PATH=%PATH%;C:\Program Files\Oracle\VirtualBoxPowerShell
Open the PowerShell console and make the following entry:
$env:PATH = $env:PATH + ";C:\Program Files\Oracle\VirtualBox"Check your settings
If you have implemented one of the three methods, you should now have access to the command. To do this, open either the CMD or a PowerShell console and enter „vboxmanage“.
vboxmanageAs output you should see thousands of suggestions for using the command:
Creating a Virtual Machine with VBoxManage
Of course here is also the procedure how to create a virtual machine now via CMD or PowerShell console.
The name testvm should of course be replaced with the name of your choice.
VM named testvm is created:
VBoxManage createvm --name testvm --registerFind out the OS identifier:
VBoxManage list ostypesIn my case it will be a FreeBSD 64bit:
VBoxManage modifyvm testvm --ostype FreeBSD_64Set RAM
VBoxManage modifyvm testvm --memory 2048 --vram 16Set the Cores of your CPU
VBoxManage modifyvm testvm --cpus 2Create a virtual HDD
VBoxManage createhd --filename testvm.vdi --size 16000Add the SATA Controller, the HDD and also the ISO File
VBoxManage storagectl testvm --name "SATA Controller" --add sata --controller IntelAHCI

VBoxManage storageattach testvm --storagectl "SATA Controller" --port 0 --device 0 --type hdd --medium testvm.vdi

VBoxManage storageattach testvm --storagectl "SATA Controller" --port 1 --device 0 --type dvddrive --medium "C:\Users\byte-sized\Downloads\FreeBSD-13.1-RELEASE-amd64-dvd1"
Set the boot order:
VBoxManage modifyvm testvm --boot1 dvd --boot2 disk --boot3 none --boot4 noneSet network card to bridge. Enter the name of your network card between the “ „:
VBoxManage modifyvm testvm --nic1 bridged --nictype1 82540EM --bridgeadapter1 "Realtek PCIe GbE Family Controller"Et voilà! The VM testvm is configured via the CMD. If you want to know more about the possibilities with VBoxManage, you can read the documentation here.
Starting the VM
It is possible to start the VM as usual with a graphical display window. Of course, this is absolutely appropriate for a first installation, since various configuration steps will most likely have to be performed.
vboxmanage startvm testvmor later to start the VM „headless“ in the background:
VBoxManage startvm testvm --type headlessShutting down and deleting a VM using VBoxManage
To shut down a VM again, we can use the following command:
vboxmanage controlvm testvm poweroffIf a VM is no longer needed, we can simply delete it again with
VBoxManage unregistervm testvm --deleteThe end
That’s it! I hope you enjoyed this little excursion into the big world of VBoxManage. See you next time!
Start the discussion