
OpenBSD ist ein Versuch das sicherste Betriebssystem auf dem Markt zu sein.
Attention: For the english version, click here!
Obwohl ich bisher mehr zu FreeBSD neigte, möchte ich mich, ab heute beginnend, mal an etwas Neues trauen und euch dabei mitnehmen. Bisher kenn ich OpenBSD nur von Produkten, wie Firewalls, die darauf basierten, habe es aber selbst noch nie installiert geschweigedenn in vollem Umfang genutzt. Das wollen wir ändern, deshalb erstelle ich mir heute mal eine neue VM. Hier zeige ich euch, wie ihr OpenBSD, aktuell in Version 7.3 in OracleBox installieren könnt.
VM anlegen
Voraussetzung ist, dass ihr bereits Oracle VirtualBox oder ein ähnliches Tool installiert habt. Sofern ihr die ISO noch downloaden müsst, so könnt ihr das hier tun. In meinem Fall ist es die install73.iso in der amd64-Architektur.
Starte ich VirtualBox öffnet sich der Manager und ich habe oben über den Menüpunkt Maschine -> Neu die Möglichkeit eine neue VM zu erzeugen.
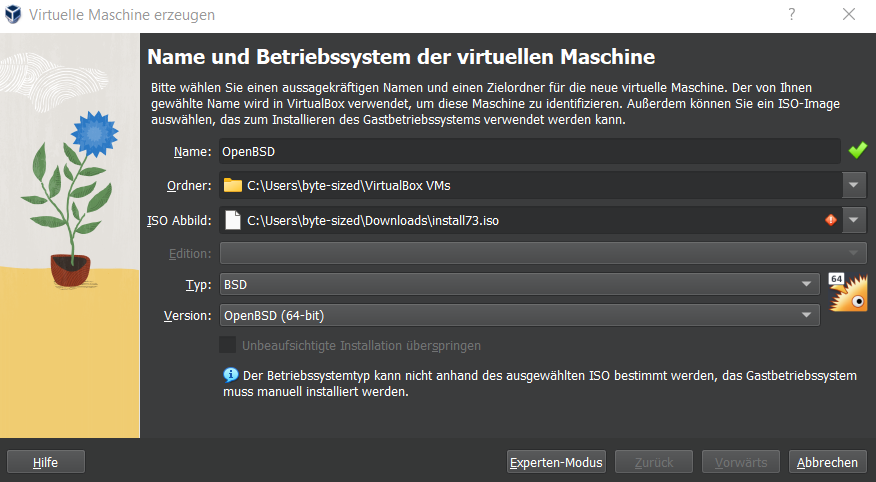
Im sich öffnenden Fenster, vergebe ich einen Namen, gebe an, wo die ISO dazu liegt und setze die Einstellungen zum Betriebssystem. Das sieht dann in etwa so aus:
Auf Vorwärts geklickt, habe ich nun die Möglichkeit, den RAM und CPU Kerne einstellen. Für den Arbeitsspeicher nehme ich mal 2GB, also 2048MB und mit zwei Kernen bin ich auch erstmal recht zufrieden. Um den Schritt abzuschließen, bestätige ich wieder mit einem Klick auf Vorwärts.
Im nächsten Schritt geht es um die Festplatte. Da belasse ich alle Einstellungen so, aber das ist jedem selbst überlassen. Zu Testzwecken bin ich mit den 16GB zufrieden und klicke wieder auf Vorwärts.
Zum Abschluss sehe ich nochmal eine Zusammenfassung meiner Einstellungen. Das sieht auch bisher ganz gut aus und bestätige mit Fertig.
Das einzige was ich noch ändern möchte, ist die Netzwerkkarte. Mit einem Rechtsklick auf die VM namens OpenBSD klicke ich auf Ändern. Gehe auf der linken Seite auf den Menüpunkt Netzwerk und setze das Dropdown-Menü von NAT auf Netzwerkbrücke und bestätige mit OK.
Damit wäre alles Nötige gesetzt und wir können die VM nun endlich starten.
OpenBSD installieren
Sobald der Installationsprozess startet, sehen wir schon bei der ersten geforderten Nutzereingabe, wie hier vorgegangen wird. Wir können wählen zwischen (I)nstall, (U)pgrade, (A)utoinstall und (S)hell. Ich entscheide mich für Install und drücke dazu die Taste „I“ und bestätige die Eingabe mit ENTER. Im weiteren Verlauf seht ihr öfters Werte in eckigen Klammern gesetzt. Das ist die Standardauswahl, wenn ihr also zufrieden seid, was darin steht könnt ihr einfach mit ENTER bestätigen, ohne eine weitere Eingabe zu tätigen. Darauf werde ich nochmal im Verlauf des Tutorials eingehen.
Danach soll das entsprechende Tastaturlayout ausgewählt werden. Mit der Möglichkeit ? oder L kann ich die enstprechenden Kürzel anzeigen lassen. Ich möchte ein deutsches Tastaturlayout, also gebe ich „de“ ein und drücke die ENTER-Taste.
Daraufhin geht es um den Hostnamen der VM. Ich wähle ganz banal byte-sized.de aus.
Die Netzwerkkonfiguration ist auch recht benutzerfreundlich. Zu Beginn werden gleich alle verfügbaren Netzwerkschnittstellen aufgelistet. Wie oben schon angerissen ist jetzt em0 bei mir in den eckigen Klammern, also mein Standardwert, den ich mit ENTER bestätigen kann, sofern ich damit zufrieden bin. Das Gleiche gilt auf für den nächsten Schritt, wenn es um die IP-Adresse für em0 geht. Hier ist autoconf schon ausgewählt, sprich, die Schnittstelle wird per DHCP konfiguriert. Selbstverständlich könnt ihr das aber auch manuell bzw. statisch vornehmen. IPv6 bestätige ich ebenfalls wieder mit ENTER, da der Standardwert auf none steht. Im Anschluss kann ich noch weitere Interface konfigurieren, falls nötig. Ich überspringe diesen Schritt.
Danach, wie auch bei FreeBSD, geht es darum ein Passwort für den Benutzer root zu erstellen. Das Password wird auch nicht angezeigt und auch keine Sternchen, wie sonst üblich, seid also nicht verwundert. Bestätigt das eingegebene Passwort im zweiten Durchlauf und dann ist auch dieser Schritt abgehakt.
SSH möchte ich direkt verfügbar haben, aber das obliegt jedem selbst. X Window System brauche ich zu Beginn jetzt nicht, deshalb verneine ich mit no.
Einen weiteren User lege ich mir allerdings an. Da ich im weiteren Verlauf, ssh als root-Benutzer deaktivieren möchte. Sofern ihr auch einen Benutzer anlegen wollt tippt in diesem Zuge gleich den Namen ein, andernfalls drückt ENTER um zu verneinen.
Wie oben schon genannt, möchte ich ssh-Zugriff für root deaktivieren. Hier kann ich wieder ganz einfach mit ENTER bestätigen.
Danach folgt die Zeitzone. Bei mir ist schon der Standardwert Europe/Berlin korrekt.
Daraufhin wird nach einer Festplattenverschlüsselung gefragt. Ich verneine und wähle gleich danach meine root disk aus namens wd0. Nun kann ich entweder eine vollständige MBR-Partition, eine vollständige GPT-Partition erstellen oder die Partitionierung eben manuell durchführen. Ich entscheide mich für den Standartwert, also MBR. Mit dem Auto-Layout meiner Festplatte bin ich zufrieden für den Anfang und bestätige mit ENTER.
File sets unter OpenBSD
Jetzt geht es daran die Sets zu installieren. Drückt gerne schon mal ENTER und installiert die Sets von cd0, also der eingehängten ISO. Auch bei der Pfadangabe und Auswahl der Sets könnt ihr bestätigen. Bevor die Installation startet, bestätige ich noch mit yes, dass ich ohne Verifizierung der ISO OpenBSD installieren möchte. Dieser Schritt dauert jetzt einen Moment. In der Zeit möchte ich hier kurz die Chance nutzen und den Begriff erklären. Der ganze Installationsprozess ist in so genannte file sets unterteilt. Nachfolgend sind alle aufgelistet:
bsd 	The kernel (required)
bsd.mp 	The multi-processor kernel (only on some platforms)
bsd.rd 	The ramdisk kernel
base73.tgz 	The base system (required)
comp73.tgz 	The compiler collection, headers and libraries
man73.tgz 	Manual pages
game73.tgz 	Text-based games
xbase73.tgz 	Base libraries and utilities for X11 (requires xshare73.tgz)
xfont73.tgz 	Fonts used by X11
xserv73.tgz 	X11's X servers
xshare73.tgz 	X11's man pages, locale settings and includes
Es werden lediglich bsd und base73.tgz zur Installation benötigt. Neuen Usern allerdings wird nahe gelegt alle zu installieren. Man hat aber auch die Möglichkeit nach der Installation weitere sets hinzuzufügen. Zum Beispiel man73.tgz ist lediglich ein file set, welches die Manpages, also manuals, enthält. Sets sind quasi vereinfacht ausgedrückt Pakete.
Ist alles installiert, steht der Standardwert auf done, also genügt ein ENTER an der Stelle.
Im Anschluss stellt OpenBSD fest, dass meine Uhrzeit vermutlich falsch ist und fragt mich, ob diese korrekt sei. Obwohl ich yes eingegeben habe, fährt er mit dem Installationsprozess fort. Eigentlich habe ich mir erhofft, die korrekte Zeit einstellen zu können. Naja…
Danach werden noch alle Konfigurationsdateien gespeichert und die Installation von OpenBSD abgeschlossen.
Nachbereitung
Danach solltet ihr eure VM schließen und die ISO aushängen. Dazu geht ihr wieder in den Manager mit einem Rechtsklick auf eure neue VM. Wählt nun den Menüpunkt Massenspeicher aus. In der Mitte des Fensters wählt ihr die install73.iso und geht auf der rechten Seite auf die CD mit einem linken Mausklick. Über den letzten Punkt im Dropdown-Menü könnt ihr nun das ISO aus dem Laufwerk entfernen.
Jetzt startet eure VM neu und ihr könnt euch nun an eurem OpenBSD-Client anmelden!
Install OpenBSD as a VM
OpenBSD is an attempt to be the most secure operating system on the market. Although I have leaned more towards FreeBSD in the past, starting today, I want to venture into something new and take you with me. So far, I have only known OpenBSD from products such as firewalls that were based on it, but I have never installed or used it extensively myself. We want to change that, so today I’m creating a new VM. Here, I will show you how to install OpenBSD, currently in version 7.3, in OracleBox.
Create a VM
To create a VM with OpenBSD in Oracle VirtualBox, you need to have VirtualBox or a similar tool already installed. If you need to download the OpenBSD ISO, you can do so here. In my case, I am using the install73.iso for the amd64 architecture.
When I start VirtualBox, the manager opens, and I have the option to create a new VM under the „Machine“ menu by selecting „New“.
After clicking „Next“, I now have the option to adjust the RAM and CPU cores. I’ll set the memory to 2GB (2048MB) and two cores for now. To proceed, I click „Next“ again.
In the next step, I can configure the hard drive settings. I’ll leave all the settings as they are for testing purposes, but feel free to adjust them as you see fit. For now, I’m satisfied with 16GB and click „Next“ again.
Finally, I see a summary of my settings. Everything looks good so far, so I confirm by clicking „Finish“.
The only thing I want to change now is the network card. To do this, I right-click on the OpenBSD VM, select „Settings“, go to the „Network“ tab on the left, change the dropdown menu from „NAT“ to „Bridged Adapter“, and click „OK“.
Now everything is set up, and we can finally start the VM.
Installation of OpenBSD
As soon as the installation process starts, we can see from the first user input prompt how it works. We can choose between (I)nstall, (U)pgrade, (A)utoinstall, and (S)hell. I choose Install by pressing the „I“ key and confirming with ENTER. Throughout the installation, you will often see values in square brackets. This is the default selection, so if you are satisfied with it, you can simply confirm with ENTER without making any further input. I will explain this in more detail later in the tutorial.
Next, the corresponding keyboard layout should be selected. I can display the corresponding shortcuts with the option „?“ or „L“. I want a german keyboard layout, so I type „de“ and press ENTER.
Then, the VM hostname needs to be set. I choose byte-sized.de.
The network configuration is also user-friendly. At the beginning, all available network interfaces are listed. As mentioned earlier, em0 is in square brackets, so it’s my default value, which I can confirm with ENTER if I am satisfied with it. The same applies for the next step when it comes to the IP address for em0. Here, autoconf is already selected, meaning the interface is configured via DHCP. Of course, you can also configure it manually or statically. I also confirm IPv6 with ENTER since the default value is set to none. Then, I can configure additional interfaces if necessary, but I skip this step.
After that, as with FreeBSD, it’s time to create a password for the root user. The password is not displayed and there are no stars, as it is usually the case, so don’t be surprised. Confirm the entered password in the second round, and then this step is also completed.
I want SSH to be directly available, but that’s up to each individual. I don’t need the X Window System at the beginning, so I decline with no.
However, I want to create another user since I plan to disable SSH access for the root user later on. If you also want to create a user, type the name now; otherwise, press ENTER to decline.
As mentioned above, I want to disable SSH access for root. Here, I can simply confirm with ENTER.
Next is the time zone. For me, the default value Europe/Berlin is correct.
Then, encryption of the hard drive is asked for. I decline and immediately select my root disk named wd0. Now I can either create a full MBR partition, a full GPT partition, or perform the partitioning manually. I choose the default value, which is MBR. I’m satisfied with the auto-layout of my hard drive for the beginning, so I confirm with ENTER.
File sets under OpenBSD
Now it’s time to install the sets. Feel free to press ENTER and install the sets from cd0, which is the mounted ISO. You can also confirm the path and set selection. Before the installation begins, I confirm with yes that I want to install OpenBSD without verifying the ISO. This step takes a moment. In the meantime, I want to take the opportunity to explain the term. The entire installation process is divided into so-called file sets. Below is a list of all of them:
bsd 	The kernel (required)
bsd.mp 	The multi-processor kernel (only on some platforms)
bsd.rd 	The ramdisk kernel
base73.tgz 	The base system (required)
comp73.tgz 	The compiler collection, headers and libraries
man73.tgz 	Manual pages
game73.tgz 	Text-based games
xbase73.tgz 	Base libraries and utilities for X11 (requires xshare73.tgz)
xfont73.tgz 	Fonts used by X11
xserv73.tgz 	X11's X servers
xshare73.tgz 	X11's man pages, locale settings and includes
Only bsd and base73.tgz are needed for installation. However, new users are advised to install all sets. It is also possible to add additional sets after installation. For example, man73.tgz is a file set that contains manual pages. Sets can be thought of as packages.
Once everything is installed, the default value is set to done, so simply pressing ENTER is sufficient.
Afterwards, OpenBSD detects that my clock is probably incorrect and asks if it is correct. Although I entered yes, it proceeds with the installation process. I had actually hoped to be able to set the correct time. Oh well…
Then all configuration files are saved and the installation of OpenBSD is completed!
The End
Afterwards, you should close your VM and unmount the ISO. To do this, right-click on your new VM in the manager and select „Storage“ from the menu. In the middle of the window, select the install73.iso and click on the CD on the right side with a left mouse click. You can now remove the ISO from the drive via the last option in the dropdown menu.
Now restart your VM and you can log in to your OpenBSD client!
Start the discussion