In diesem Tutorial zeige ich dir, wie du in WSL2 Xfce4 als Desktopumgebung installieren kannst. Das Subsystem bietet dir die Möglichkeit verschiedene Linux-Distributionen unter Windows zu installieren. WSL2 kannst du erst ab Windows 10 Version 2004, Build 19041 oder unter Windows 11 nutzen.
Attention: For the english version, click here!
Voraussetzungen
Falls du WSL2 noch installieren musst, verlinke ich dir hier das entsprechende Tutorial.
Öffne ein Terminal unter Windows und gebe folgenden Befehl ein:
wsl --installHierbei wird standardmäßig Ubuntu installiert. Während des Installationsprozesses wirst du aufgefordert einen Username und ein Passwort zu vergeben. Nach Abschluss wechselst du automatisch in dein frisch installiertes Ubuntu.
Um weiter fortzufahren, rate ich dir, erstmal dein Repository zu updaten und alle weiteren Pakete zu upgraden:
sudo apt update && sudo apt upgrade -yWSL2 mit Xfce4 installieren
Jetzt bist du auf dem aktuellen Stand und du kannst dich an die Installation von Xfce4 machen. Hierbei installierst du gleich noch Xfce4-goodies und xrdp mit. So hast du gleich schon eine gute Softwareauswahl vorinstalliert. Mittels xrdp kannst du dann via Remotedesktopverbindung auf Ubuntu bzw. auf die GUI zugreifen.
sudo apt install xfce4 xfce4-goodies xrdp -yDas kann je nach Internetverbindung einen Weile in Anspruch nehmen.
Zum Schluss musst du nur noch die IP-Adresse herausfinden.
ip aDas Kommando sollte dir folgenden Output anzeigen:
1: lo: <LOOPBACK,UP,LOWER_UP> mtu 65536 qdisc noqueue state UNKNOWN group default qlen 1000
    link/loopback 00:00:00:00:00:00 brd 00:00:00:00:00:00
    inet 127.0.0.1/8 scope host lo
       valid_lft forever preferred_lft forever
    inet 10.255.255.254/32 brd 10.255.255.254 scope global lo
       valid_lft forever preferred_lft forever
    inet6 ::1/128 scope host
       valid_lft forever preferred_lft forever
2: eth0: <BROADCAST,MULTICAST,UP,LOWER_UP> mtu 1500 qdisc mq state UP group default qlen 1000
    link/ether 00:15:5d:75:b1:7b brd ff:ff:ff:ff:ff:ff
    inet 172.28.237.42/20 brd 172.28.239.255 scope global eth0
       valid_lft forever preferred_lft forever
    inet6 fe80::215:5dff:fe75:b17b/64 scope link
       valid_lft forever preferred_lft forever
Die Schnittstelle eth0 hat die IP-Adresse 172.28.237.42
Wenn du jetzt mittels Remotedesktopverbindung darauf zugreifen möchtest, wird vermutlich spätestens nach Eingabe der Login-Daten die Session abbrechen. Um Xfce4 trotzdem lauffähig zu bekommen, musst du noch die Datei /etc/xrdp/startwm.sh anpassen. Setze dazu diese zwei Einträge unter die Kommentare:
unset DBUS_SESSION_BUS_ADDRESS
unset XDG_RUNTIME_DIR
So sollte deine startwm.sh nun aussehen:
#!/bin/sh
# xrdp X session start script (c) 2015, 2017, 2021 mirabilos
# published under The MirOS Licence

# Rely on /etc/pam.d/xrdp-sesman using pam_env to load both
# /etc/environment and /etc/default/locale to initialise the
# locale and the user environment properly.

unset DBUS_SESSION_BUS_ADDRESS
unset XDG_RUNTIME_DIR

if test -r /etc/profile; then
        . /etc/profile
fi

test -x /etc/X11/Xsession && exec /etc/X11/Xsession
exec /bin/sh /etc/X11/Xsession
Starte nun die Remotedesktopverbindung:
- Windows-Taste
- Suche
- Remotedesktopverbindung
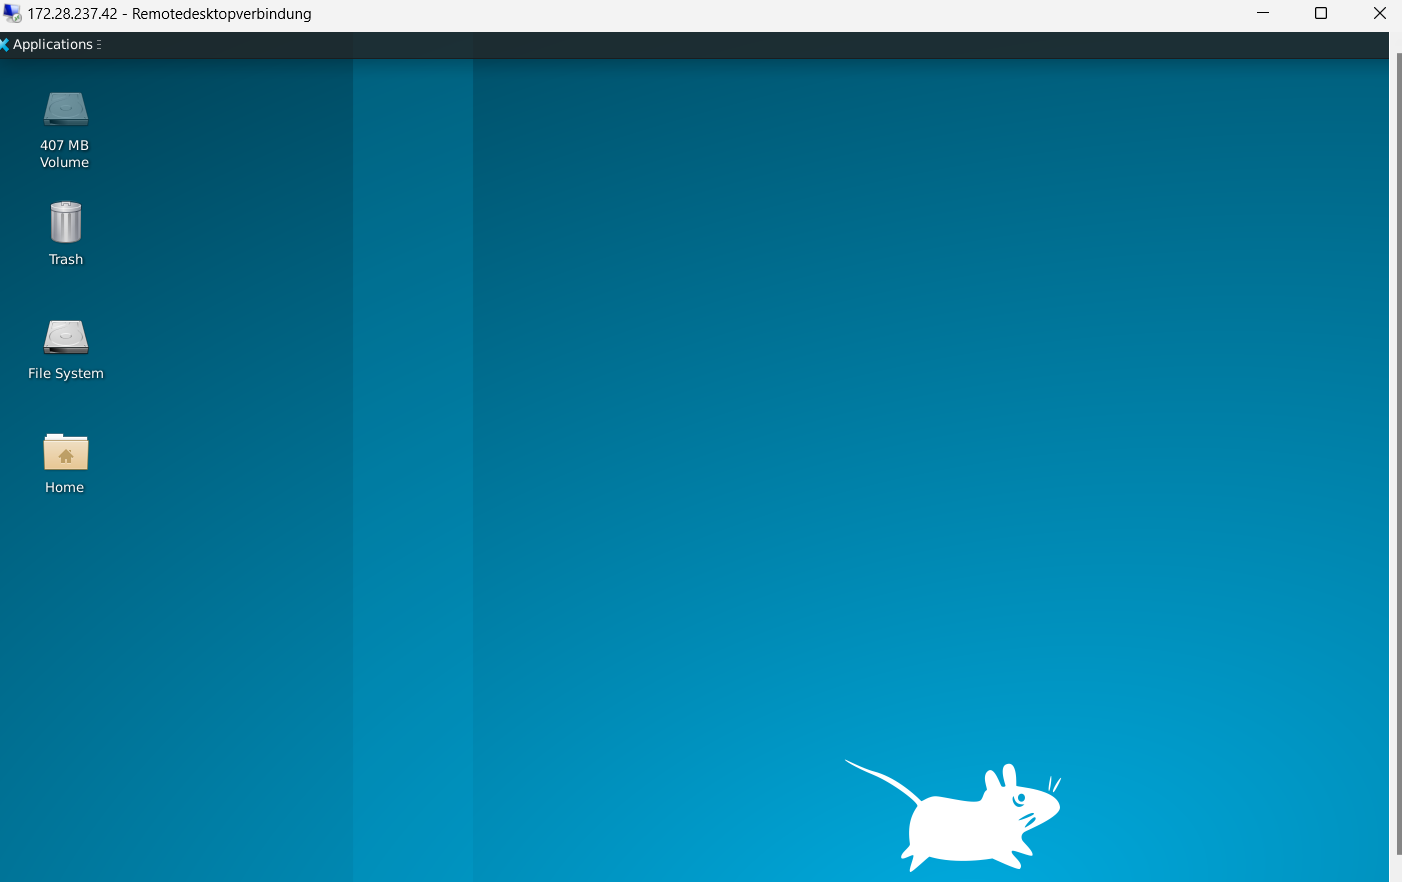
Gebe die IP-Adresse ein und et voilá du kannst dich mit deinen Daten einloggen und die Session bricht nicht mehr ab.
Viel Spaß beim Ausprobieren!
How to install Xfce4 in WSL2
In this tutorial, I will show you how to install Xfce4 as a desktop environment in WSL2. The subsystem allows you to install various Linux distributions on Windows. You can use WSL2 starting from Windows 10 version 2004, build 19041, or on Windows 11.
If you still need to install WSL2, I will link the corresponding tutorial here.
Open a terminal in Windows and enter the following command:
wsl --installThis will install Ubuntu by default. During the installation process, you will be prompted to set a username and password. After completion, you will automatically switch to your freshly installed Ubuntu.
To continue, I recommend first updating your repository and upgrading all packages:
sudo apt update && sudo apt upgrade -yInstalling WSL2 with Xfce4
Now you are up to date and ready to install Xfce4. During this process, you will also install Xfce4-goodies and xrdp, giving you a good selection of pre-installed software. Using xrdp, you can access Ubuntu and the GUI via Remote Desktop Connection.
sudo apt install xfce4 xfce4-goodies xrdp -yThis might take a while depending on your internet connection.
Finally, you need to find out the IP address.
dennis@byte-sized.de:~$ ip aThe command should give you the following output:
1: lo: <LOOPBACK,UP,LOWER_UP> mtu 65536 qdisc noqueue state UNKNOWN group default qlen 1000
    link/loopback 00:00:00:00:00:00 brd 00:00:00:00:00:00
    inet 127.0.0.1/8 scope host lo
       valid_lft forever preferred_lft forever
    inet 10.255.255.254/32 brd 10.255.255.254 scope global lo
       valid_lft forever preferred_lft forever
    inet6 ::1/128 scope host
       valid_lft forever preferred_lft forever
2: eth0: <BROADCAST,MULTICAST,UP,LOWER_UP> mtu 1500 qdisc mq state UP group default qlen 1000
    link/ether 00:15:5d:75:b1:7b brd ff:ff:ff:ff:ff:ff
    inet 172.28.237.42/20 brd 172.28.239.255 scope global eth0
       valid_lft forever preferred_lft forever
    inet6 fe80::215:5dff:fe75:b17b/64 scope link
       valid_lft forever preferred_lft forever
The interface eth0 has the IP address 172.28.237.42.
When you now try to access it via Remote Desktop Connection, the session will likely terminate after entering the login details. To get Xfce4 running, you need to adjust the file /etc/xrdp/startwm.sh. Add these two entries below the comments:
unset DBUS_SESSION_BUS_ADDRESS
unset XDG_RUNTIME_DIR
Your startwm.sh should now look like this:
#!/bin/sh
# xrdp X session start script (c) 2015, 2017, 2021 mirabilos
# published under The MirOS Licence

# Rely on /etc/pam.d/xrdp-sesman using pam_env to load both
# /etc/environment and /etc/default/locale to initialise the
# locale and the user environment properly.

unset DBUS_SESSION_BUS_ADDRESS
unset XDG_RUNTIME_DIR

if test -r /etc/profile; then
        . /etc/profile
fi

test -x /etc/X11/Xsession && exec /etc/X11/Xsession
exec /bin/sh /etc/X11/Xsession
Now start the Remote Desktop Connection:
- Press the Windows key
- Search for „Remote Desktop Connection“
- Enter the IP address and voilà, you can log in with your credentials, and the session will no longer terminate.
Have fun experimenting!
Start the discussion