
Da der isc-dhcp-server mit dem Ende 2022 sein End-of-Life erreicht hat, ist KEA, der ebenfalls vom ISC (Internet Systems Consortium) stammt, das neue Mittel. In diesem Artikel zeige ich, wie man den KEA-DHCP installiert und grundlegend konfiguriert. Der alte Artikel FreeBSD 13: Ein DHCP-Server konfigurieren ist damit als überholt anzusehen.
Attention: For the english version, click here!
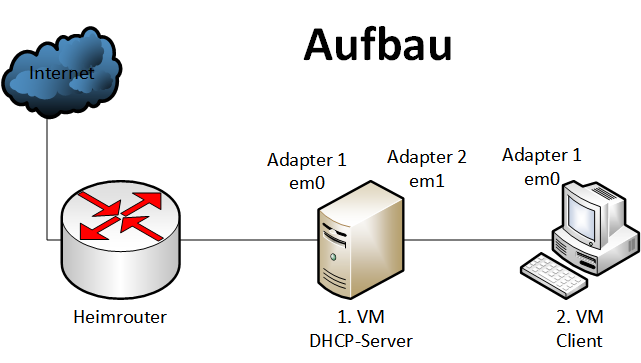
Für das Beispiel habe ich wieder zwei VM’s in Verwendung.
- VM als DHCP-Server mit zwei Netzwerkkarten, eine als Netzwerkbrücke (DHCP vom Heimrouter) und die andere als Internes Netz (statische IP 10.0.0.1 auf em1), siehe Bild
- VM als DHCP-Client mit einer Netzwerkkarte als Internes Netz (em0 auf DHCP)
Fangen wir an:
KEA DHCP installieren
Nachdem die erste VM hochgefahren ist, müssen wir uns das Paket installieren. Vorher möchte ich mir allerdings das neuste Repository herunterladen, also:
pkg updateDas eigentliche Package für einen IPv4-fähigen DHCP-Server installiere ich mit:
pkg install kea-dhcp4Einrichten des KEA’s
Ist das Paket erfolgreich installiert, können wir uns an die Konfiguration des Servers machen. Soll der DHCP-Server nach einem Neustart des Computers wieder automatisch starten, führen wir folgenden Befehl aus:
service kea enableAls Nächstes bearbeiten wir unsere Konfigurationsdatei. Unter /usr/local/etc/kea/ finden wir bereits die Datei mit dem Namen kea-dhcp4.conf
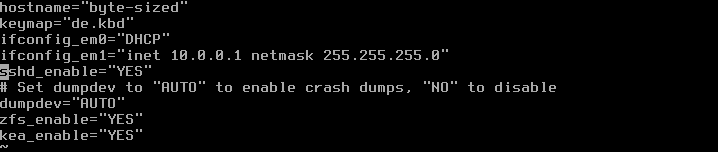
Wie gewohnt lösche ich auch hier wieder alle Zeilen, damit ich eine saubere und auf meine Bedürfnisse zugeschnitte Konfigurationsdatei habe. Mein DHCP-Server soll auf em1 (mein internes Netz) hören und darüber entsprechend Netzwerkkonfigurationen verteilen. Weiter soll er innerhalb des Pools 10.0.0.100 bis 10.0.0.200 IP-Adressen vergeben werden können. Jeder Client im Netz soll natürlich auch noch sein Standardgateway 10.0.0.1 und die beiden DNS-Server 10.0.0.2 und 10.0.0.3 erhalten. Dann sieht unsere Konfigurationsdatei für den KEA DHCP-Server wie folgt aus:
{
    "Dhcp4": {
        "interfaces-config": {
            "interfaces": [ "em1" ]
        },
        "subnet4": [
            {
                "subnet": "10.0.0.0/24",
                "pools": [ { "pool": "10.0.0.100-10.0.0.200" } ],
                "option-data": [
                    {
                        "name": "routers",
                        "data": "10.0.0.1"
                    }
                ]
            }
        ],
        "option-data": [
            {
                "name": "domain-name-servers",
                "data": "10.0.0.2, 10.0.0.3"
            }
        ]
    }
}
Zu guter Letzt starten wir den Server über
service kea startund sollten nach kurzer Zeit auf der zweiten VM eine Netzwerkkonfiguration erhalten. Somit sind wir nun ein fester Teilnehmer im Netzwerk und können mit anderen kommunizieren. Sollten nachträglich Änderungen an der Datei vorgenommen werden, muss der Server natürlich neugestartet werden, um die aktuelle Konfigurationsdatei einzubeziehen.
Configure KEA DHCP on FreeBSD 13
Since the isc-dhcp-server reached its End-of-Life by the end of 2022, KEA, also from the Internet Systems Consortium (ISC), has become the new solution. In this article, I’ll demonstrate how to install and configure the KEA DHCP. The old article „FreeBSD 13: Configuring a DHCP Server“ is now considered outdated.
For this example, I’m using two VMs again. Interface configuration of the first VM:
- VM as a DHCP server with two network cards, one as a network bridge (DHCP from the home router), and the other as an internal network (static IP 10.0.0.1 on em1), see image.
- VM as a DHCP client with one network card as an internal network (em0 on DHCP).
Let’s get started: Install KEA DHCP
After the first VM is up, we need to install the package. Before that, I want to download the latest repository:
su
pkg update
Install the package for an IPv4-capable DHCP server:
pkg install kea-dhcp4
Setting up KEA
Once the package is successfully installed, we can proceed with configuring the server. If you want the DHCP server to start automatically after a computer restart, execute the following command:
service kea enable
Next, edit our configuration file. Under /usr/local/etc/kea/, you’ll find a file named kea-dhcp4.conf. As usual, I’ll delete all lines here to have a clean and tailored configuration file. My DHCP server should listen on em1 (my internal network) and distribute network configurations accordingly. Additionally, IP addresses within the range 10.0.0.100 to 10.0.0.200 should be assignable within the pool. Each client in the network should receive its default gateway (10.0.0.1) and the two DNS servers (10.0.0.2 and 10.0.0.3). Here’s how our configuration file for the KEA DHCP server looks:
{
    "Dhcp4": {
        "interfaces-config": {
            "interfaces": [ "em1" ]
        },
        "subnet4": [
            {
                "subnet": "10.0.0.0/24",
                "pools": [ { "pool": "10.0.0.100-10.0.0.200" } ],
                "option-data": [
                    {
                        "name": "routers",
                        "data": "10.0.0.1"
                    }
                ]
            }
        ],
        "option-data": [
            {
                "name": "domain-name-servers",
                "data": "10.0.0.2, 10.0.0.3"
            }
        ]
    }
}
Finally, start the server with:
service kea start
After a short time, the second VM should receive network configurations. Now, we are a solid participant in the network and can communicate with others. If changes are made to the file later, the server must be restarted to incorporate the current configuration file.
Join the discussion
1 reply to “KEA DHCP-Server unter FreeBSD 13 konfigurieren”
[…] KEA DHCP Server on FreeBSD 13. https://byte-sized.de/linux-unix/kea-dhcp-server-unter-freebsd-13-konfigurieren/ […]
If someone is lazy and just wants an Ansible role for installing, configuring (& testing the configuration) Kea on FreeBSD I wrote a role for it some time ago.
https://github.com/oscarcarlsson/ansible-role-kea