Auf einem Cisco Router einen DHCP-Server zu konfigurieren, wird selten das Mittel der Wahl sein. Dennoch gibt es auch Bereiche, wo dieser Dienst durchaus in Kombination mit dem Router eingesetzt wird, wie beispielsweise der heimische Router für das Heimnetzwerk.
Attention: For the english version, click here!
In Unternehmen kann diese Kombination natürlich einen Single-Point-Of-Failure darstellen und hätte natürlich auch fatale Folgen als zuhause. Je nach Größe des Unternehmensnetzwerks ist die zusätzliche Last auf dem Router zu meiden betiehungsweise auf ein dedizierten Server auszulagern. Allerdings ist es ein tolles Mittel für Test-Szenarieren oder vielleicht auch Update-Prozesse für Geräte, die frisch aus der Verpackung kommen.
Grundlegende Konfiguration des Routers
Natürlich ist es individuell zu betrachten, was zu einer grundlegenden Konfiguration des Routers gehört. In meinem Fall gehört dazu das beziehungsweise die Interface(s), ein Username mit Passwort, SSH und den Zugriff auf den Router (Command Line Access).
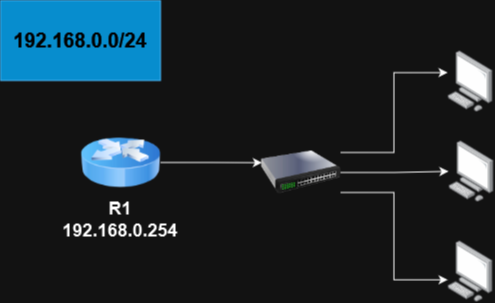
Absolutes Minimum sollte für dieses Beispiel aber eine IP-Adresse sein:
R1> enable
R1# configure terminal

R1(config)# interface GigabitEthernet0/0/0
R1(config-if)# ip address 192.168.0.254 255.255.255.0
R1(config-if)# no shutdown
Falls dein Router beispielsweise schon über eine Konfiguration verfügt, kannst du die Konfiguration mit write erase löschen. Falls du vor dem Neustart gefragt wirst, ob du speicher willst, gebe unbedingt no ein. Andernfalls wird die startup-config wieder durch die running-config überschrieben und das Gerät fährt mit der alten Konfiguration wieder hoch, nur das obige Interface wäre umkonfiguriert.
Hast du das Speichern abgelehnt, ist der Router nach dem Neustart zurückgesetzt.
Unter Umständen möchtest du den Router nicht zurücksetzen, so kann es möglich sein, dass du vielleicht den DHCP Server aus Sicherheitsgründen auf dem Gerät deaktiviert hast. Um ihn zu aktivieren, gebe service dhcp ein.
DHCP auf dem Router einrichten
Mit dieser Befehlsreihe legst du einen DHCP-Pool namens Byte-Sized an. Im Anschluss hinterlegst du die nötigen Informationen. Darunter natürlich auch das Netz, aus dem sich der DHCP-Server an Adressen bedienen soll. Ist das geschehen, kommen eigentlich die üblichen Angaben, wie man sie von Windows oder anderen DHCP-Anwendungen kennt: Name der Domain, DNS-Server und das Standardgateway, sowie Lease-Dauer.
Das Ganze sollte dann so aussehen:
R1(config)#ip dhcp pool Byte-Sized
R1(dhcp-config)# network 192.168.0.0 255.255.255.0
R1(dhcp-config)# domain-name byte-sized.de
R1(dhcp-config)# dns-server 192.168.0.253
R1(dhcp-config)# default-router 192.168.0.254
R1(dhcp-config)# lease infinite
Natürlich soll die Adresse vom Standardgateway und dem DNS-Server nicht geändert werden. Wenn du einen Drucker im Netz hast, sollte dessen IP natürlich auch statisch bleiben. Du musst sie also als Ausnahmen hinzufügen:
R1(config)# ip dhcp excluded-address 192.168.0.253,192.168.0.254Damit ist das wichtigste getan. Jetzt sollten innerhalb kürzester Zeit deine Clients eine Netzwerkkonfiguration beziehen, sofern diese auf DHCP eingestellt sind.
Configure a DHCP server on a Cisco Router
Configuring a DHCP server on a Cisco router may not be the preferred method in many enterprise scenarios, as it can introduce a single point of failure and potentially have significant consequences. However, there are situations where using a router as a DHCP server, such as in a home network setup, can be suitable.
In a corporate environment, relying solely on a router for DHCP services can pose risks, especially in larger networks. It’s often recommended to offload this responsibility to dedicated DHCP servers to reduce the load on the router and improve reliability. Nonetheless, using a router as a DHCP server can be a useful approach in test scenarios, including educational purposes or maybe update processes of some devices freshly out of the box.
Basic configuration of the router
Of course, it’s individual to consider what constitutes a basic router configuration. In my case, this includes the interface(s), a username with a password, SSH, and access to the router (Command Line Access).
The absolute minimum for this example, however, should be an IP address.
R1> enable
R1# configure terminal

R1(config)# interface GigabitEthernet0/0/0
R1(config-if)# ip address 192.168.0.254 255.255.255.0
R1(config-if)# no shutdown
If your router already has a configuration, you can erase it using the „write erase“ command. After a restart, your router will be reset.
If your router already has a configuration, you can erase it using the write erase command. If you are asked to confirm whether you want to save the configuration before restarting, be sure to enter „no.“ Otherwise, the startup configuration will be overwritten by the running configuration, and the device will boot up with the old configuration, except for the mentioned interface changes.
If you declined to save, the router will be reset after the restart.
However, you might not want to reset the router. In such cases, you may have disabled the DHCP server on the device for security reasons. To re-enable it, you can use the service dhcp command.
Configure the DHCP server
With the following command sequence, you create a DHCP pool named Byte-Sized and then provide the necessary information, including the network from which the DHCP server should allocate addresses. After that, you’ll specify the usual details you would find in Windows or other DHCP applications: domain name, DNS server, and the default gateway, lease time.
The whole process should look like this:
R1(config)#ip dhcp pool Byte-Sized
R1(dhcp-config)# network 192.168.0.0 255.255.255.0
R1(dhcp-config)# domain-name byte-sized.de
R1(dhcp-config)# dns-server 192.168.0.253
R1(dhcp-config)# default-router 192.168.0.254
R1(dhcp-config)# lease infinite
Of course, the address of the default gateway and the DNS server should not be changed. If you have a printer on the network, its IP address should also remain static. So, you’ll need to add them as exceptions:
R1(config)# ip dhcp excluded-address 192.168.0.253,192.168.0.254
With that, the most important tasks are completed. Now, your clients should obtain a network configuration within a short time, provided they are set to DHCP.
Start the discussion